how to fix white blank screen on laptop
Windows 10 often experiences Blue Screen of Death errors. There are several other screens of death that a Windows machine can face. An aggravating problem that prevents you from using a laptop effectively is when a laptop starts up and displays a white screen instead of the login screen. The white screen issue on laptops could be brought on by a non-working display, a bad graphics card, malware/viruses, etc.
let’s go to see how to fix the white blank screen on the laptop startup
Press Ctrl + Alt + Delete
Restart Your Windows 10 Operating System By Force
The plain, brilliant white blank screen is the primary sign of the White Screen of Death mistake. You could believe that nothing can be done to remove this blank screen. Naturally, your initial course of action would be to make the machine restart on its own.
To perform a force restart, push and hold the power button for a few seconds. Do not remove your finger from the power button, till the shutdown sequence finishes. Reboot your device to see if you are free of the White screen errors.
Remove every peripheral that is connected to a USB ports
Your machine's White blank Screen problem may be caused by external gadgets. Unplug USB devices from the corresponding slots. To try and solve this issue, not even your USB mouse or keyboard should be attached.
Restart the system once it is clear of any USB accessories. As you start the system now, the white blank screen problem should be resolved. To identify which USB device is responsible for the White blank Screen problem, plug in each one separately.
Remove your laptop battery
This approach seems simple, yet it has a lot of benefits. Many screen issues, according to some users, can be resolved by just taking out the battery and restarting the computer.
Connect Laptop to External Display
As we have mentioned above, the display problem is a major reason for laptops' white screens. So It is necessary to connect your laptop to an external display to check this issue.
How to connect to an external display
To connect the external display to a laptop, locate the correct port on the body of your laptop. Most laptops utilize one or more of the following connections: HDMI, DisplayPort, DVI, or USB-C (Thunderbolt 3). Some older laptops use VGA.
Update drivers
Update graphics drivers to a newer version can be easily resolved. You can do this in safe mode or with another user account that works properly. Sometimes you may even have to remove your graphics card driver entirely.
The steps to enter Safe Mode are as follows
How to update your graphics driver
Type device manager into the taskbar's search box, and then choose it from the list of results.
Uninstall graphics driver
Type device manager into the taskbar's search box, and then choose it from the list of results.
Select the arrow to expand Display adapters
Under Display adapters, right-click the adapter, then select Properties.
Select the Delete the driver software for this device check box, and then select OK.
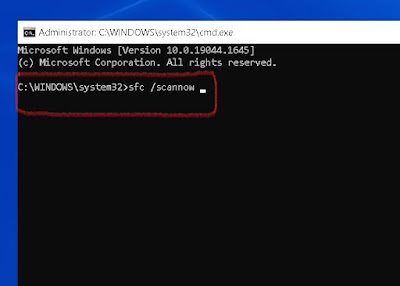
Run sfc/scannow command
On your keyboard, press the Windows logo key and R key at the same time to invoke the Run box.
Type cmd and press Shift+Ctrl+Enter together on your keyboard to open Command Prompt in the administrator mode.
Note: Do NOT click OK or just press the Enter key as that won’t allow you to open Command Prompt in the administrator mode.
Type sfc /scannow (or copy-paste) and press Enter. Then wait for the verification is 100% complete.
Use the DISM tool
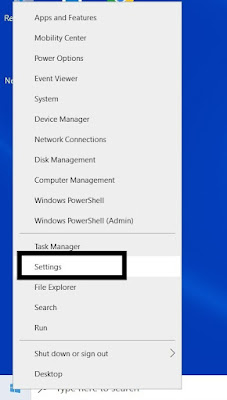
Press the Windows key + X and click on Windows PowerShell (Admin) to open the app with administrative privileges.
Type or paste the following command and press Enter:
DISM /Online /Cleanup-Image /RestoreHealth
Be patient and don't pause the repair procedure; it can take ten minutes or longer.
Restart your computer after the DISM utility has fixed your files.
Deployment Image Servicing & Management, or DISM, is used to resolve any corruption issues that can hinder the SFC tool's ideal operation. Additionally, if the Windows 11 installation file is damaged, this program will be helpful.
Use the System Restore
Press Windows Key + S, type create a restore point and select the option from the results.Click on the System Restore button.
The most recent restore point will be suggested, but you may click Choose a different restore point and then press the Next button to choose one that was already made.
Select the desired restore point and click Next.
System files should be restored to their previous, healthy state after the process is finished.
Update Windows
Settings > Update & Security settings > Windows Update
Wait for the process to complete and restart your device to install the changes.
Do not restart or turn off your computer during this process. Interrupting the process could deliver incomplete or faulty patches of the Windows update files.
Uninstall a Recent Windows Update
Modify your registry
Enter Safe Mode by following the instructions from the above solution. (Check your drivers)
In Safe Mode, press Windows Key + R to open the Run dialog. Now enter regedit and press Enter or click OK.
When Registry Editor opens, navigate to the following location:
Modify your registry
1. Enter Safe Mode by following the instructions from the first solution.
2. In Safe Mode, press Windows Key + R to open the Run dialog. Now enter regedit and press Enter or click OK.
3. When Registry Editor opens, navigate to the following location:
HKEY_CURRENT_USER Software Microsoft Windows NT CurrentVersion Winlogon
In the right pane, you should see a Shell string. Right-click on it and choose Delete from the menu.
When the confirmation dialog appears, click on Yes.
Once you delete this value, restart your PC and try to start Windows normally.


No comments